My previous Macbook Pro was a beast and it wanted to go out fighting before finding a new home. Check it out:
I’m working on a review of the new Retina Macbook Pro and hope to have it up soon. I can confirm that you cannot see a pixel onscreen. If you want to upgrade your current monitor to achieve this and have vision like me, just take off your glasses…you can’t see a pixel. I know and you’re welcome.
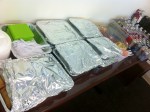
A catering order came up and the request was for 75 people. This can get messy and we didn’t get confirmation until the last minute. The following is what we came up with. Consider it if you need something quick, asian and clean. I hate measuring (it also takes the fun out doesn’t it? Then again, if you get paid to do this your taste buds better be in line with the masses) so the following are estimates.
Korean BBQ Short Ribs
30 pounds Korean short ribs (they are usually $6-7 per pound! Some markets have short rib for soup at only .99 cents per pound. These are usually not uniform in thickness but from the same part of the cow. Half of what I bought was this to cut down on cost. You can also find them pre-marinated.
Marinade:
Pinch of chili pepper (i use korean but not nessasary)
cup onion powder
cup garlic powder
10 cups soy sauce
8 cups sugar
quarter cup ginger
quarter cup worstershire
dash hickory smoke (optional, since my intention was to broil and not traditionally grill)
Directions: take a few five gallon painter’s buckets and line them with trash bags. Dump the meat. Dump the marinade. Let it absorb over night. Set the oven to broil. Line cookie sheets with parchment paper or foil (easier to clean) and place the beef. It’s done when the bones start to protrude. Cut between the bones for “finger food” status and garnish with sesame seeds or green onions. Actual labor time for me was prepping the marinade and cutting at the end which i would guess totaled 20 minutes.
Thai Drumsticks
20 pounds chicken drumsticks (or wings or thighs, I used drumsticks because they were cheaper and had less number of bones)
salt
pepper
paprika
garlic powder
sugar
sweet chili sauce
Directions:
clean the chicken by rinsing under cold water until it “feels” clean, you’ll know when that is. Be careful for splashing chicken water (safety first!). Pat dry or let it sit for 10 minutes. Mix even parts of the above ingredients and evenly coat the chicken. Line you cookie sheets and bake at 400 degrees. When the chicken starts retracting from the bone (or nears 165 degrees F) start painting the sweet chili sauce onto it. BTW, this chili sauce you can find in the asian isle of your market and is usually a dressing or dipping sauce. Put the chicken back in the oven for 5 minutes and repeat a couple more times. Labor time was mostly washing and brushing the sauce, but I’d estimate 15 minutes. Garnish with peanuts (be careful of allergies) and/or diced bell peppers.
You can cover the beef and chicken in foil and leave in the oven at 140 degrees F to keep warm until service. I wouldn’t do it more than an hour though otherwise things could get fry.
Meanwhile cut the fruit. Some tips. Pineapple is good when you pull a leaf and it comes off easily. Coating in salt, resting and rinsing it off can bring out the flavor but not nessasary. Small cookie cutter comes in handy to remove the core after slicing discs. Apples discolor fast and easy so i would recommend cutting last and tossing it in a sweet citric juice like OJ or in our case lemon + sugar. We kept the grapes in clumps of 5-6 per branch to make them easier to handle.
If you plan an event down to the toothpick, then execution should be stress free. Also, though this is asian themed, don’t use asian time…prepare to be finished 30 minutes ahead of schedule because you never know what will happen. I had to stop in the middle of preparation because some lady came in asking for 18 sandwiches and I had never seen her before. No problem since we were half an hour ahead.
My drive from Menlo Park to Sunnyvale and vice verse can take as little as 15 minutes. It can also take as long as 50 minutes depending on the traffic especially on the 101. That also means that I can be either happy or ready to karate chop someone in the throat . This is what I’ve learned, if you have carpool then use it. Avoid the lane next to it as everyone tries to inch their way there. Also avoid the lane closest to the exit as cars from the onramp are trying to merge and there may be a lot of them depending on the time of day. Lastly, on average switching lanes in varying speeds of traffic doesn’t help. I’ll often see people cut me off and zip into another lane only for me to pass them by just a few minutes later. With a smile on my face.
Speaking of which, there’s a technique that tricks your brain into thinking you’re happier than you are. It’s called the Mona Lisa half smile and works like how you might think. Examine the portrait of Miss Mona and notice that half smile/smirk. Mimic that, possibly exposing some of your pearly whites, or buttery yellow if you smoke, and see what happens. It works for me, at least until a car ahead of me slows to 40 mph on the freeway and when i go to pass it’s none other than an old asian woman in a Raiden hat and Lasik shades.
Does that make me a racist if I’m asian and have the hat?
That’s what I told myself when Apple announced the Macbook Pro refresh today at the Worldwide Developers Conference. I knew it was going to be a beast. Heck last year’s model was a monster and my first gen i7 still handles rendering tasks with relative ease. To read and see the new Macbook Pros as a total package just made me scramble seeing what goodies I could sell to justify the upgrade price. Your computer may not suck but the one I’m staring at does.
Here’s the rundown of key features for the 2012 Macbook Pro. It’s slim. Jobs demoed the iPod by saying it fits in your pocket. The Macbook Air was pulled out of a manilla envelope to show off it’s thin figure. The new Macbook Pro’s are said to be no bigger than a finger nail. It’s not tapered like the Air, most likely to house some surprising internals and a battery that lasts 7.5 hours with 30 day standby time (if you get one with an SSD). The Apple Store first asks you if you want standard or Retina displays with $400 separating the 15″ entry level versions of each The 13″ Macbook Pro doesn’t seem to have the Retina display option which comes in at a resolution of 2880 x 1800 or 220dpi or more pixels than that big HDTV you have in your living room.
Out with the old and in with the new. Old being optical drive and ethernet. New being the intriguing inclusion of HDMI, USB 3.0 AND two thunderbolt ports. 8gb of ram and 256 gb SSD hard rive come standard on the $2,199 base model Retina Macbook Pro. There is also a new cooling system which sucks air through three slim vents and and channels them into a non-symetrical fan that produces undulating frequencies almost imperceptible to the human ear. The new heat efficient (and unbelievably powered) Ivy Bridge quad core i7 cpu combined with this new form of heat dissipation should alleviate any heat issues with previous MacBooks. It’s also good to see nVidia and Intel reuniting on the Apple notebook with the 1GB GeForce GT 650M.
It looks like Apple had a pretty good day today and Siri did a nice job kicking the event off.
I was stuck in Palo Alto waiting for an appointment at the Genius Bar. With a couple of hours to kill, I took out my new Sony a57 to see what would happen. I learned a few things along the way …
…the built in mic under most circumstances is useful only as a reference to sync audio recorded from another source
…lots of CMOS wobble in handheld shots
…history lesson – image capturing sensors are either CMOS or CCD. CMOS is regarded as cheaper and arguably superior in taking photographs so it’s found in most DSLRs. Because of the lens selection, which can give a shallow depth of field and natively blur the foreground or background, digital SLRs became a popular choice for restricted budgets as a means of producing high quality film-like movies. the trade off is CMOS sensors have a tendency to make images look warped or rubbery when fast pans are used.
…I didn’t expect this much wobble just walking with it though. It may have to do with Sony’s in body stabilization which suspends the sensor and moves it to counteract hand shakiness.
…hand straps are better than the neck straps that come with cameras
….whenever you think your done recording wait another 10-15 seconds and try and give that same time before hand if your going to do some panning. the extra footage comes in handy for editing especially if transitions are going to be used.
…Sony and Panasonic helped create the AVCHD codec in which their cameras record. It’s pretty advanced and from what I can tell is part of the reason the resulting 28 mpbs avchd .mts files are comparable to a canon that records in 50 mbps .mp4. The downside are the .mts files don’t play well with Final Cut. So don’t drag all the files off the SD card onto a drive. Instead use the import from camera option in Final Cut. Something about keeping them in the camera created folders makes it easier for Final Cut to use the clips otherwise it’ll be an extra unnecessary step converting all the mts files into prores.
… 1080p (progressive) = 1,080 horizontal lines of resolution displayed all together. 1080i (interlaced) = 1,080 horizontal lines of resolution displayed alternately, so in actuality at any given frame your only seeing 540 lines or half of the 1,080 lines that make up that frame.
…1080p at 60 frames per second is not going to happen right now in Final Cut. The clips I shot at that quality were not useable in FCPX and was changed to 24 frames. I haven’t found a work around yet. 1080i at 60 frames works well though. 60 frames a second is desirable if one wants to slow motion things in post. The effect looks smoother since there are frames of information to work with.
…if you want that cinematic film look these are the things i would do to my camera settings. 1) 24 frames per second 2) lower saturation and contrast all the way – it’s easier to color grade in post 3) use a lens with an aperture of 3.5 or below – for that shallow depth of field, blurry goodness effect.
…the huge Microsoft Store is just wrong next to the tiny Apple Store. The huge empty Microsoft store is just right next to the packed tiny Apple Store.
…all of the above only helps to enhance. if there isn’t any thought into the composition or emotions than the greatest camera and editing really only dresses up poop. It’s still going to stink. Because it’s poop.
…I guess dressed up poop can be entertaining sometimes. So here’s some high resolution doo doo.
I can’t remember the first camera I operated but I think it was a Kodak disposable. The first piece of equipment I chose was a Panasonic Mini Dv camcorder that took 1.3 megapixel stills. I started getting excited when my cell phone options began to include image taking capabilities and I made sure I got the iPod Touch 4th gen (the first with a camera) when it came out so I could start capturing pictures and video. The iPod stills weren’t that bad until I found out they didn’t even qualify as one megapixel.
I didn’t pay much attention into what effect a megapixel has on an image until I knew my equipment was deficient. I planned on nabbing an iPhone 4 because I heard that it packed a pretty decent 5 megapixel camera. I was all set and ready to go. It turns out my pictures still seemed somewhat dissatisfying to me. I began looking into a point and shoot pocket sized camera and wondered why anyone would buy one when smart phones could do the same thing. The same thing crossed my mind when I saw Costco stocking super zooms and DSLRs. I didn’t the slight increase in image quality was worth carrying all those lenses and that meaty body. My assumptions were obviously all wrong.
The Mega-Pixel Myth…..ever heard of it? It basically states that anything above 5 megapixels yields photo print quality and the human eye will not easily distinguish the resolution differences. So all those camera ads touting the newest camera punching an extra 2 megapixels actually adds no discernible difference in quality.
Life is about options and the iPhone didn’t give me much. It’s in phone camera app gave me a focus lock, HDR, and that’s pretty much it. Even third party apps that added exposure locks lacked any serious control over basic settings that most pocketable point and shoots came standard with.
My phone did offer zoom though. I thought that was great until I actually used it and wondered why it turned out such shitty images. Turns out the iPhone and other forms of digital zooms relied on a processor to guesstimate what the image would look like closer. Many dedicated pocket cameras and all those Costco super zooms had optical zooms that didn’t require guessing because the actual lenses where at play here not some program.
The biggest problem I had was where I was taking these photographs. Outdoors I could usually produce some decent shots but indoors or at night time these images would become saturated in graininess. DSLRs had the large sensors that are roughly the size of a stamp versus the ibuprofen sized sensors found in pocket friendly cameras. These large sensors were more receptive to low light conditions. They also had many setting options like aperture (controlling how much light passes through the lens), shutter speed (which also affects light entering the sensor once the shutter button is pressed), and ISO sensitivity. I could also select what kind of lighting situation Im under, change white balance (no more orange tinged indoor shots) and the biggest selling point of a DSLR, the type of lenses I could use. Telephoto, 50mm, wide angle, and macro are just a few of the many available lenses that suit all sorts of situations while providing a nice shallow depth of field. These lenses more than megapixels are what produce sharper images.
So I went out and bought a used Sony a300 knowing all of the above and happily new I was going to be able to capture beautiful photos. Then I got caught up in one article after another and started getting bother that my first DSLR only had 10.2 megapixels. I had pixel envy at the newer Canons and Nikons that sport 16, 18 and 20 plus MP. I took my time and pounced when I saw a deal on a brand spanking new Sony a57 sporting a whopping 16.1 megapixels. I popped on my favorite Minolta 50mm f1.7 lens and snapped some pics. I opened Aperture on my Mac and was surprised that I wasn’t blown away. I took my old a300 and took the same shot with the same lens and settings and remembered, the Mega Pixel Myth. See for yourself.
Composition and creativity do more for a photograph than the density capabilities of a camera. Check out the cheap camera challenges of pro photographers at Digital Rev. At the end of the day, I was part right in getting excited over my iPhone. It’s a device that I need to have and Chase Jarvis made famous the saying “the best camera is the one that’s with you.” With the amount of money I’ve spent though, I’m making sure I take my a57 everywhere, including bed. Good night.
Sony Alpha a300 on the left vs. Sony Alpha SLT-a57 on the right
Sony a300 10.1 megapixelsSony a57, 16.1 megapixelsSony a300 10.1 megapixels